35+ Free Simple Rental Property Checklist Templates (PDF)
A rental property checklist template summarizes all the essential items and conditions that should be reviewed before, during, and after a tenant occupies a rental property. This landlord checklist ensures that the property is in proper order and any issues are documented. The primary purpose of the rental property inspection checklist is to provide a clear and systematic process for landlords and tenants to follow during the rental period.
Table of Contents
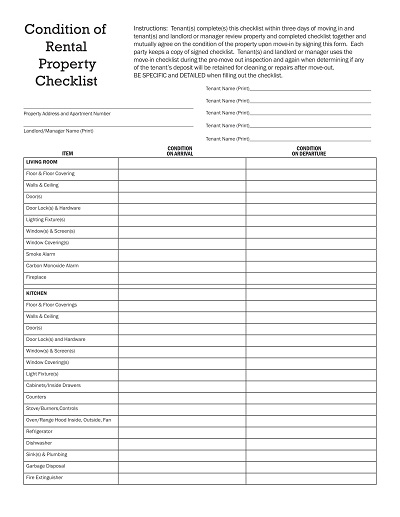
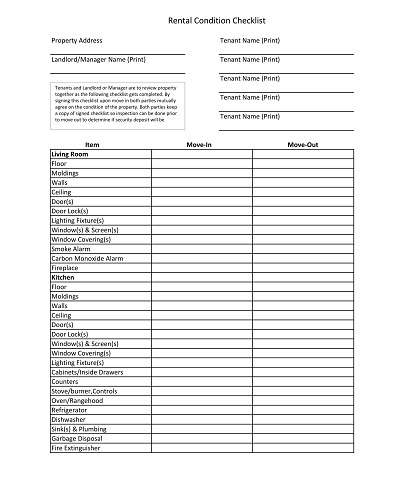
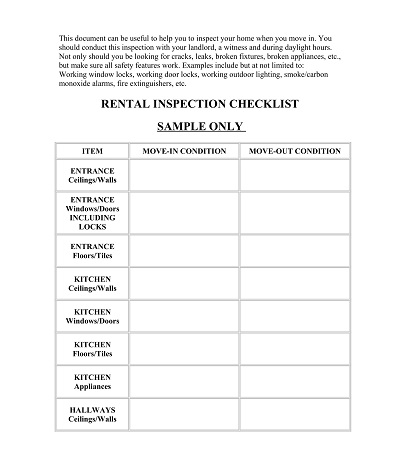
These rental inspection checklist templates help assess the property’s state at move-in and move-out to determine if any damages have occurred. It protects the concerns of both parties and ensures transparency. The Rental Property Inspection Checklist Template simplifies returning security deposits based on the property’s condition at the end of the tenancy.
Download Free Rental Property Checklist
What is a Rental Property Checklist?
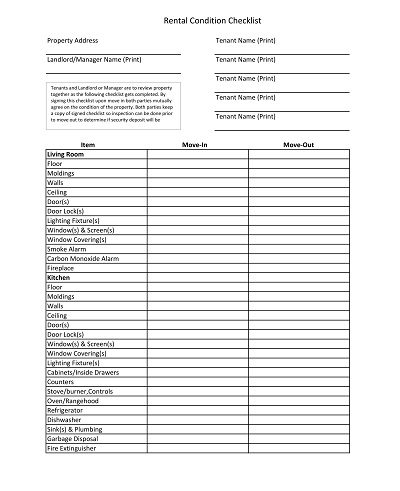
Both landlords and tenants use a Rental Property Checklist to document the condition of a rental unit at the beginning and end of a lease. This checklist includes details of each aspect of the property’s state, from the operation of appliances to the integrity of windows, walls, and floors. By going through the property and ticking off each item, the process ensures that everything is noticed. The inspection checklist is a reliable reference to assess any change or damages during tenancy.
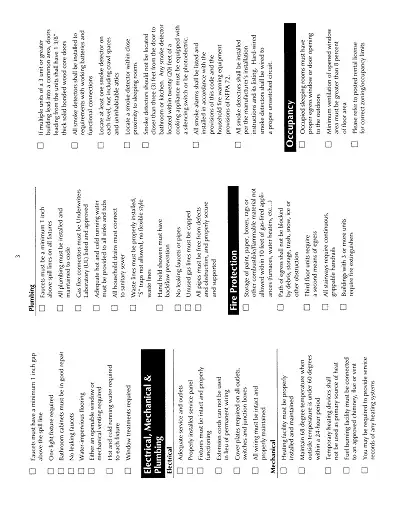
The checklist typically covers various items, like electrical fixtures, plumbing, heating and cooling systems, and cosmetic details like paint and carpets. For landlords, the checklist is vital to maintain the value and integrity of their property. As well as it provides a legal basis for any damage claims. For tenants, it offers protection against unwarranted claims and ensures the return of their security deposit upon fulfilling their tenancy obligations.
Benefits of Using a Rental Property Checklist
Using a rental property inspection checklist offers numerous benefits for landlords and tenants alike. Here are some key advantages:
- Comprehensive Inspection: It ensures that the landlord and the tenant thoroughly inspect the property before moving in. This is to identify any existing damages, defects, or issues that must be addressed and prevent disputes over responsibility later.
- Tenant Satisfaction: Tenants appreciate landlords who show professionalism and transparency. Using a checklist reassures tenants that the property has been thoroughly inspected. It ensures all issues have been noted and will be addressed promptly. This boosts tenant satisfaction and can contribute to a positive tenant-landlord relationship.
- Simplified Move-Out Process: A move-in checklist efficiently compares the property’s condition at move-out. This simplifies the process to determine whether any damages occurred during the tenancy. If deductions from the security deposit are necessary, highlight them. It minimizes conflicts and leads to a smoother move-out process.
- Improved Tenant-Landlord Relations: Setting clear expectations when using a rental inspection checklist. Tenants understand their responsibilities for property care, while landlords transparently communicate what is needed for a total security deposit return. This mutual understanding can contribute to a more compatible tenant-landlord relationship.
- Consistent Standards of Quality: A rental inspection checklist helps to maintain consistent standards across many properties. This ensures that all tenants receive the same level of quality and that every property is up to par. It is essential for the reputation and value of the rental business. It helps landlords maintain a high level of professionalism and tenant satisfaction.
- Legal Protection: Checklists can indicate property conditions during move-in and move-out. It provides legal protection to landlords in case of disputes. They offer a precise reference point that can help resolve conflicts efficiently. Proper documentation is vital to protect the interests of landlords and tenants.

What to Include in a Rental Property Checklist?
Creating a rental property checklist is crucial for landlords and residents to ensure a smooth rental process and avoid misunderstandings or disputes later on. Here’s a detailed list of crucial components to include in a rental inspection checklist:
General Information
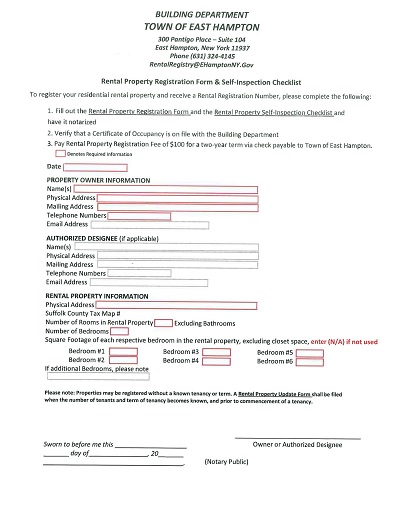
Start by including the basic information about the rental property, such as:
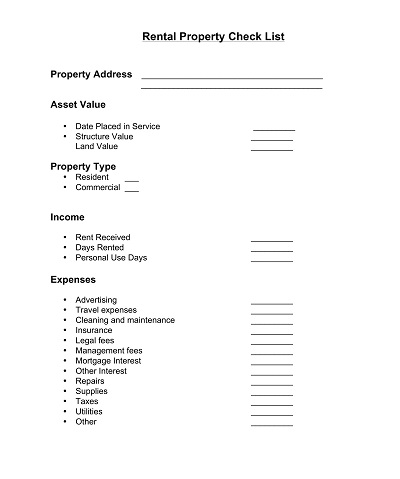
- Property address
- Landlord’s contact information
- Tenant’s contact information
- Date of move-in/move-out
Condition of the Property
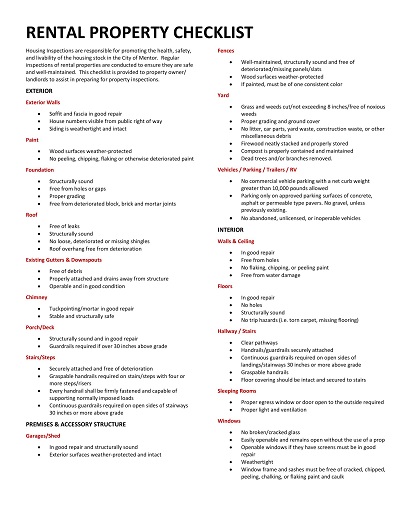
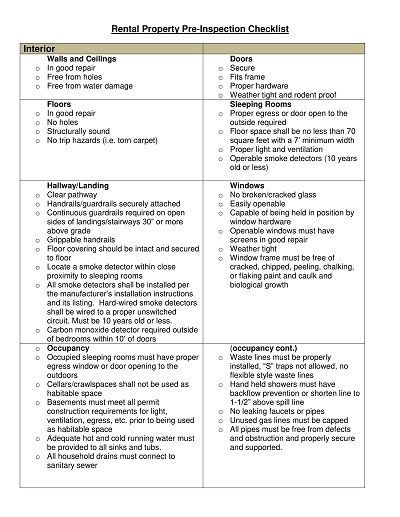
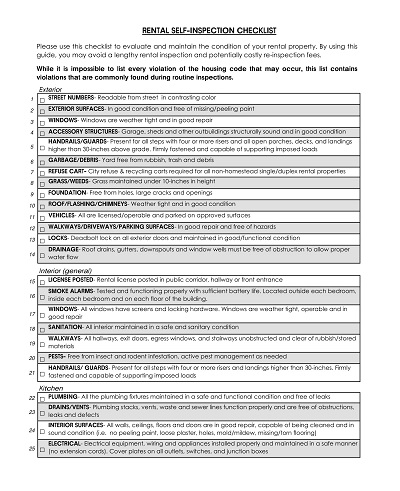
It’s important to thoroughly inspect the rental property before the tenant moves in and document its condition. This will be a reference point for any damages or issues arising during the tenancy.
- Walls: Check for any cracks, holes, or stains.
- Floors: Note any scratches, stains, or damages to carpets, tiles, or hardwood floors.
- Ceilings: Look for water stains or cracks.
- Windows: Ensure they open and close correctly, and check for cracks or damages.
- Doors: Verify that locks, knobs, and hinges work smoothly.
- Lights: Test all light fixtures, switches, and bulbs.
- Appliances: Inspect the condition and functionality of all appliances (e.g., stove, refrigerator, dishwasher, microwave).
- HVAC System: Test heating and cooling systems to ensure they work correctly.
- Plumbing: Check faucets, toilets, sinks, and drains for leaks or damages.
- Electrical Outlets: Ensure all outlets are working and are properly grounded.
- Smoke/Carbon Monoxide Detectors: Test alarms and replace batteries if necessary.
- Fire Extinguishers: Verify the existence and functionality of fire extinguishers.
- Security Features: Note the condition of locks, alarms, and other security measures.


Utilities
Include a section for utilities to be addressed, such as
- Electricity,
- Gas,
- Water,
- Trash
- Internet/Cable/Phone
Note any utility meter readings at the time of move-in.
Interior and Exterior Cleanliness
Ensure the renting property is clean before the tenant moves in, including:
- Carpets: Vacuumed and shampooed.
- Floors: Swept, mopped, or polished.
- Appliances: Cleaned inside and out.
- Walls and Ceilings: Wiped down for any stains or marks.
- Windows: Washed inside
- Ensure the property is clean and free of debris both inside and outside.
- Note any existing damage or cleanliness issues.
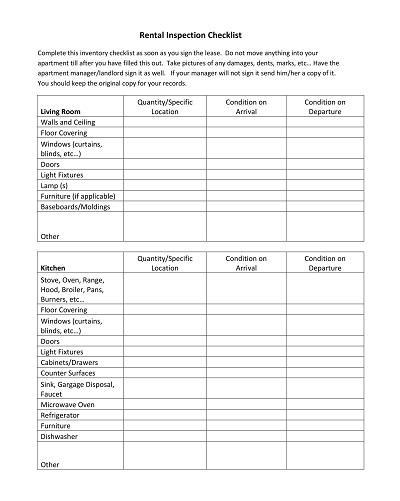
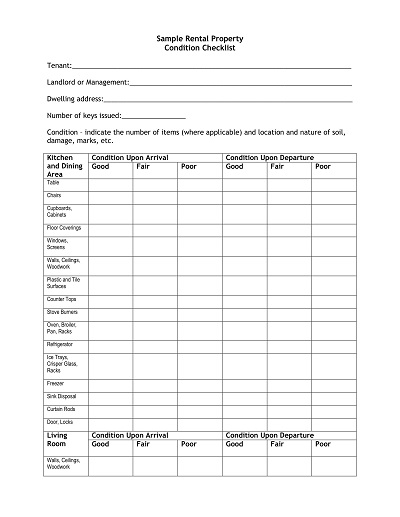
Inventory
Include a list of all items the landlord provides, such as furniture, appliances, and other amenities. Have the tenant review and sign off on this inventory list to avoid future disputes over missing or damaged items.
Sign and Date
Once the checklist is complete, it’s crucial for both the owner and tenant to sign and date it. This documentation serves as concrete proof of mutual agreement on the condition of the rental property.
Additional Terms and Conditions
Incorporate any extra agreements or specific terms pertinent to the rental property. These may encompass pet policies, parking arrangements, or delineation of maintenance responsibilities. Outline these details to ensure clarity and transparency throughout the leasing period.
Different Types of Rental Property Checklist
Several rental property inspection checklists are designed to ensure the smooth management and maintenance of rental units:
- Move-In Checklist: A comprehensive inventory of the property’s condition before the tenant occupies the space. It includes all rooms, appliances, and fixtures.
- Move-Out Checklist: A detailed review of the property’s condition upon the tenant’s departure. It notes any changes or damages during the tenancy.
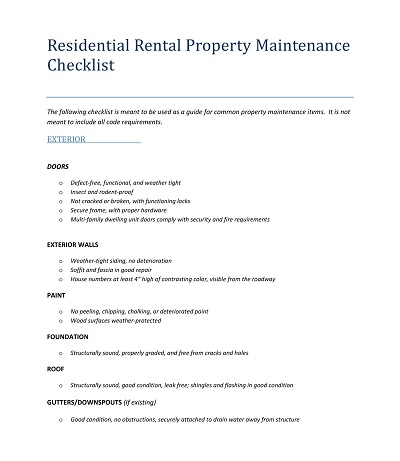
- Maintenance Checklist: It outlines regular maintenance tasks to keep the property in good repair, such as seasonal HVAC servicing, gutter cleaning, and landscaping.
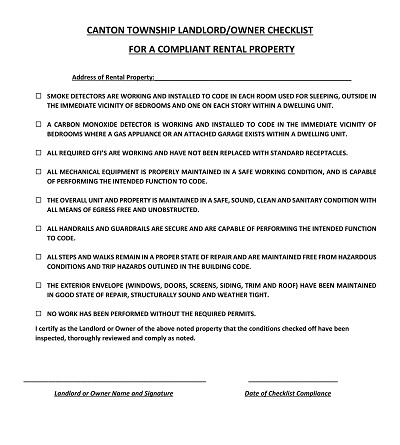
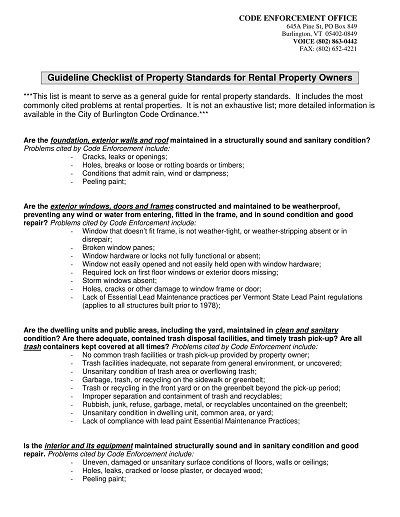
- Safety Compliance Checklist: An audit of safety features and compliance with local regulations. It includes smoke detectors, carbon monoxide detectors, fire extinguishers, and proper egress.
- Cleaning Checklist: Guidelines for cleanliness standards throughout the rental property for tenant upkeep and professional cleaning services during turnovers.
- Renovation Checklist: A list of updates or improvements planned or completed to inform tenants of recent changes and track property investment.
- Emergency Procedures Checklist: A guide for tenants detailing steps to take and contact information in emergencies like fires, floods, or security breaches.
- Inspection Checklist: A thorough inspection form used during periodic checks on the rental property’s condition outside the standard move-in/move-out times.
How to Create the Rental Property Checklist Template?
Creating a rental property checklist from scratch involves several vital steps to ensure thoroughness and efficiency. These steps are:
Step 01: Select a Digital Tool
Choose a versatile digital tool that fulfils your checklist needs. Google Sheets is an excellent option for real-time updates and sharing capabilities, while Microsoft Excel allows for complex data manipulation and offline access.
Step 02: Design the Checklist Format
Craft a clear and insightful format in your chosen digital tool. Organize the entries with a header row and individual rows for checklist items. Use filters and sorting capabilities to navigate through status updates. For visual distinction, use conditional formatting to highlight statuses or concerns.
Step 03: Establish Categories for Inspection
Make your checklist into logical categories reflecting the various aspects of the property – such as Interior, Exterior, Electrics, Plumbing, and Security. This categorical approach lends itself to a more systematic inspection and ensures comprehensive coverage of all relevant areas.
Step 04: Set Standards and Conditions
For each checklist item, articulate clear, measurable standards that define the expected condition, like “No visible leaks or corrosion” for plumbing checkpoints. This precision helps to mitigate subjectivity and maintain high, consistent standards.
Step 05: Add Detailed Descriptions
Provide succinct descriptions or criteria for what forms meet the standard. For instance, explain what a ‘working’ smoke detector entails; it must be fitted correctly, have no damage, and pass a test button operation.
Step 06: Implement a Rating System
Develop a rating system that can communicate the condition of an item at a glance. Options include a numerical scale correlating with specific criteria or coloured labels that condense the inspection results into understandable outcomes.
Step 07: Include Space for Notes
Allocate sufficient space in your checklist template for personalized notes, which can catalogue issues and specific observations for assessment. This space is a critical tool for future referencing and property management.
Step 08: Review and Update Regularly
Set a routine to review and revise your checklist to adapt to new industry standards, updated laws, and inspection feedback. The evolution is vital to maintain a relevant and practical checklist that serves properly over various tenants and property evolutions.
How to Customize a Rental Property Checklist Template?
To customize a rental inspection checklist template, follow these general steps:
- Select a Template: Choose a suitable template per your needs. You can select any of the templates from above. These editable templates are free to use.
- Analyze the Template: Familiarize yourself with the template’s sections and items to understand its structure and purpose.
- Identify Customization Needs: Determine specific requirements based on your property type, tenant preferences, and regulatory standards.
- Modify Checklist Items: Add, remove, or edit checklist items according to your property’s unique features, maintenance needs, and inspection criteria. You can write the Tenant and Landlord’s Name, Property Address Move-In, or Move-Out Date.
- Adjust Sections: Customize sections such as kitchen, bathroom, living areas, and exterior spaces to match the layout and condition of your rental property.
- Include Additional Details: Incorporate additional fields or comment sections for detailed observations, maintenance notes, or tenant feedback.
- Format and Design: Adjust the layout, font styles, colours, and branding elements to align with your preferences or corporate identity.
- Test and Finalize: Review the customized checklist to ensure clarity, completeness, and practicality. Make adjustments as needed before finalizing the document.
- Save and Distribute: Save the customized checklist template in a preferred format (e.g., PDF, Word) and distribute it to relevant interested parties, like property managers, tenants, and maintenance staff.